Here's what to expect
A fresh new look
- A new layout when you log in
As a Kiwibank or NZHL kiritaki (customer), you'll see a new view of your 'Accounts' when you log in — with the option to switch between list or grid for the layout that works best for you.
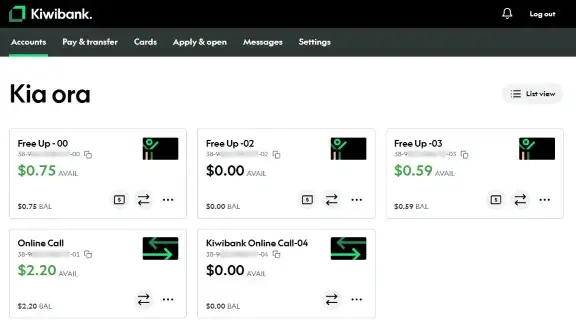
- Changes to 'Pay & transfer'
'Pay & transfer' has a fresh new-look with added extra safety when you make a payment.
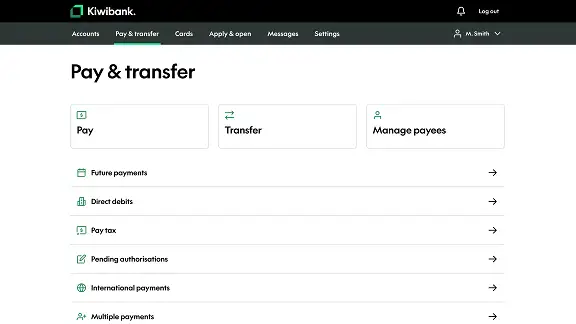
- One of the improvements is that internet banking will adjust to fit your screen, whether you're using a phone or computer.
- Like renovating a house, we're updating things gradually - some areas may have a new look, while others will still look the same for now.
Need help finding your way around the new online banking experience? See our how-to guides.
Web addresses may look different
During the rollout, you may notice the web address change as you move between new and current pages. This behaviour is expected and secure, as long as they contain the below:
Kiwibank web addresses
Authentic Kiwibank web addresses will always contain "kiwibank.co.nz". You can expect to see pages switching between the following during our update:
- banking.kiwibank.co.nz/...
- www.ib.kiwibank.co.nz/...
NZHL web addresses
Authentic NZHL web addresses always contain "nzhltransact.co.nz". You can expect to see pages switching between the following during our update:
- banking.nzhltransact.co.nz/...
- www.nzhltransact.co.nz/...
Once the upgrade is completed, the web address will be consistent.
Keep banking as usual
You don't need to do anything as we work through the refresh, just log in to online banking as usual. If you have any questions, please read our guide below.
Thanks for your patience while we make these improvements.
Help & how-to guides
You can make a payment from the Accounts overview or by selecting Pay & transfer at the top of the screen.
- Log in to internet banking.
- From the Accounts overview, identify the account you'd like to make a payment from and click the '$' icon at the bottom right of the box.
- Follow the prompts to make a payment.
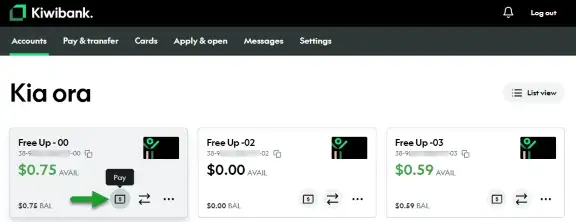
See step-by-step instructions for making a payment.
You can make a transfer from the Accounts overview or by selecting Pay & transfer at the top of the screen.
- Log in to internet banking.
- From the Accounts overview, identify the account you'd like to make a transfer from, click the icon with the two arrows at the bottom right of the box.
- Follow the prompts to make the transfer.
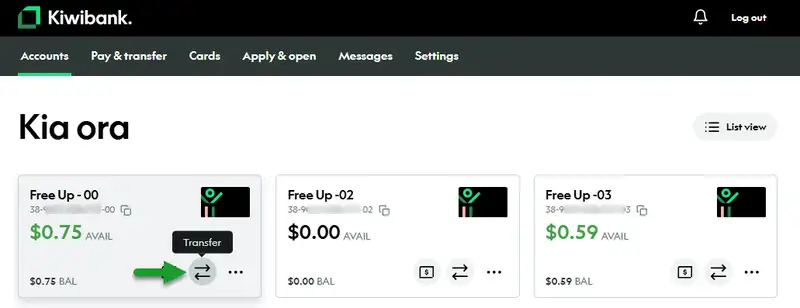
See step-by-step instructions for making a transfer.
You can set up an automatic payment by selecting Pay & transfer at the top of the screen.
- Log in to internet banking.
- Select 'Pay & Transfer' at the top of the screen.
- Click 'Pay' and follow the prompts to make an automatic payment.
See step-by-step instructions for setting up an automatic payment.
You can access your statements from the Accounts overview by selecting Settings at the top of the screen and then clicking Statement vault — or by following these steps.
- Log in to internet banking.
- From the Accounts overview, identify the account you'd like to see statements for and click the icon with the three dots at the bottom right of the box.
- Follow the prompts to see and download your statements.
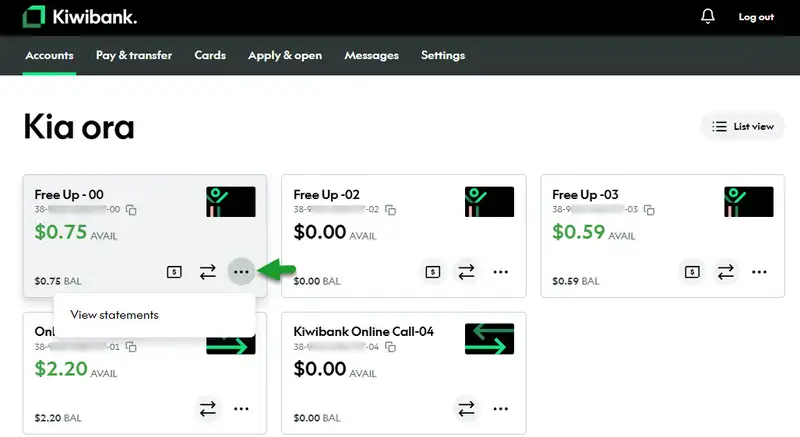
You can choose how your accounts show on your Accounts overview.
- Log in to internet banking.
- From the Accounts overview click the 'List' or 'Grid' icon in the top right corner of the screen to change how your accounts appear.
List view
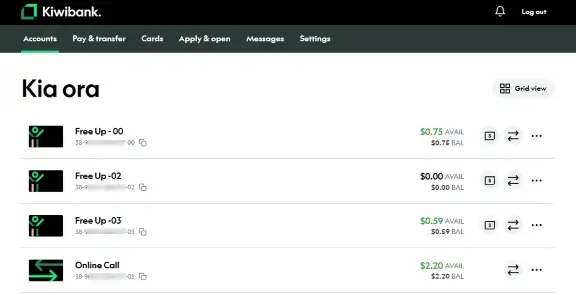
Grid view

- Log in to internet banking.
- From the Accounts overview click one of your accounts and you'll be taken to recent transaction history for this account.
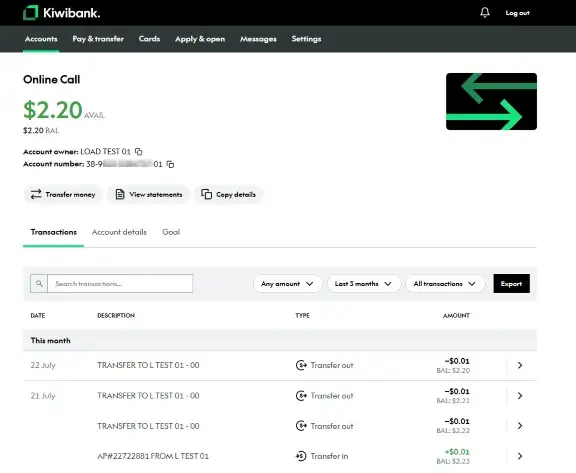
- Log in to internet banking.
- From the Accounts overview click one of your accounts and you'll be taken to a recent transaction history for this account.
- To see the details of a single transaction, click on that transaction and the details will display on the side.
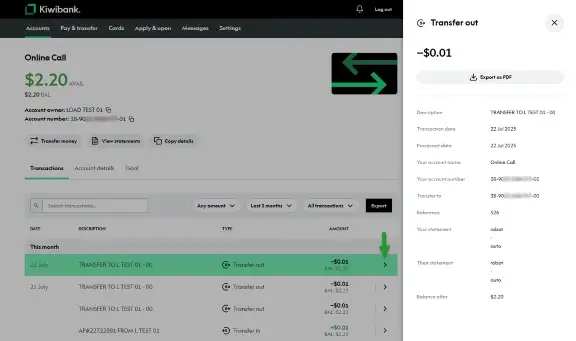
- Log in to internet banking.
- From the Accounts overview click one of your accounts and you'll be taken to recent transaction history for this account.
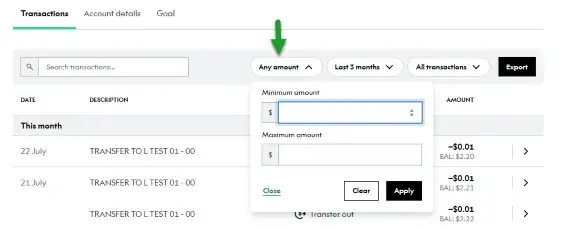
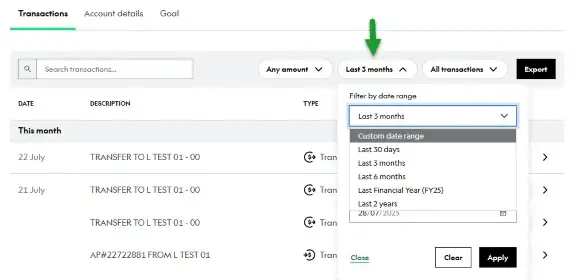
- Use the Search transactions box or any of the filter icons (Any amount, Any date, All transactions) to find specific transactions.
Filter your transactions by amount
Filter your transactions by date
Filter your transactions by type

- Log in to internet banking.
- From the Accounts overview click on one of your accounts and you'll be taken to a recent transaction history for this account.
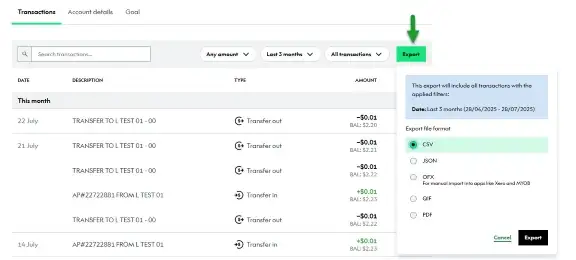
- Click the Export icon and select the file format you'd like your transactions to be exported in (CSV, JSON, OFX, QIF, PDF).
- Log in to internet banking.
- From the accounts overview click one of your accounts and you'll be taken to an overview of the transactions for this account.
- Use the filters to select which transactions you'd like to export. For example, you can choose a longer date range. The export will include all transactions with the applied filters for the selected date range. Exports are limited to two years.

The notes feature is no longer available in internet banking. You can still read notes you've saved before, but you won't be able to edit them or create new ones.
How to access your read-only notes
- Log in to internet banking.
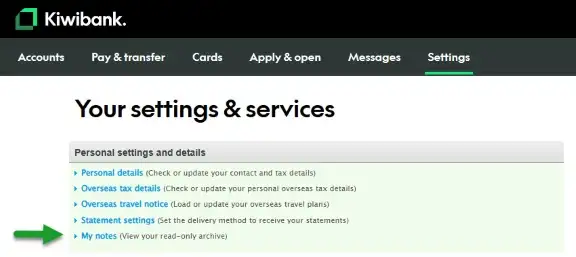
- Go to Settings at the top of the screen.
- Under Personal settings and details select My notes to see previously saved notes.
Our Goal Tracker tool is currently unavailable in internet banking while we work on updates, but you can still use it in our mobile app.